Homemade Kimchee (Kimchi)


(Written by PaleoBoyfriend) There are many different ways to make kimchi and you can use many different vegetables.  Fermented foods are super healthy and I feel can have a place in the paleo lifestyle.  The problem with store bought kimchi is that they all contain sugar, which is not healthy and is used in order to speed up the fermentation process thus making it to store shelf quicker.  It is for this reason I decided to make my own kimchi, as home made kimchi typically does not have this ingredient.  It is surprisingly easy to make and is very delicious.


HOMEMADE KIMCHEE (KIMCHI)

You need the following ingredients:

Napa Cabbage 4-5 lbs

Salt, NOT iodized (I use sea salt)

fish sauce 1/4 cup, the one I used did not contain sugar

ginger, to taste

garlic, a few cloves to taste

onion, I typically use green onion but didn’t have any so white onion was used instead, it really doesn’t matter.

Korean red pepper 1/4 cup, medium spicy, more or less could be used depending on how spicy you want it


Misc. Kitchen Items:

Cutting Board

Knife

1 large bowl.  (Large enough to fit all of your chopped cabbage.)

Colander

Food processor

4-5 Mason Jars (Doesn’t have to be mason jars, just make sure whatever container you use, it’s air tight.)

photo


Directions:

image[2]     photo


1.  Half the cabbage, de-core, then chop as shown above.


image[1]     image


2. In the large bowl, add a layer of cabbage then liberally pour on sea salt.

image[1]     image[2]

3.  Continue adding salt with each layer of cabbage until all cabbage is in the bowl, let sit for 45 minutes to 1 hour

image

4.  prepare other ingredients while cabbage is dehydrating

image[1]

5.  put onions, ginger, garlic, fish sauce, and pepper into a processor.  Chop all ingredients together, they should still be very coarse.


photo

6.  cabbage should be shriveling, you can mix it if you want and pour out the excess water that will be at the bottom of the bowl.


image[2]


7.  transfer the cabbage to a colander and let sit for about 10 minutes

image


8.  rinse off the cabbage to get most of the salt off

photo


9.  pour contents of the food processor into the large bowl, then squeeze the remaining water out of the cabbage

image[2]


10.  as you are squeezing the excess water from the cabbage place it into the bowl with the other ingredients

image     image[1]      photo


11.  mix everything together

image[2]     image[1]


12.  pack the mixture into air tight jars

image


13.  After sealed, the jars should sit out at room temperature for 48 hours to ferment, then transfer to the fridge  🙂

I felt like chicken last night…

For some reason on Wednesday night I always feel like eating chicken.  It must be because whenever I ask my kids what they want to eat for dinner they usually respond with either Mac and Cheese (Not the home made one, which I know how to make, but the boxed one.  GROSS!!  Never again!!), Noodles (They mean Top Ramen or Maruchan instant noodles.  Yeah…  NO.), or Chicken and Rice.  I always opt for the chicken and rice because the prep is next to nothing.  Then I either hang with them in the other room while they play, or I have them help me bake something for dessert.  Wednesday is a very chill day.  A day to rest from the non-stop weekend up to Tuesday.  There’s always something going on and it’s busy busy busy.

So last night I defrosted 4 leg quarters (leg with attached thigh) and I cut the legs off of the thigh, seasoned it with Montreal Seasoning and Garlic Salt and then popped it in the preheated oven.  The recipe below is for two of them.  The other two I made a curry with which I have posted HERE.  The rice is incredibly easy to make especially if you own a  rice cooker.  I don’t know about you, but I don’t measure the water using the lines on the pot.  I use my finger.  Does anyone else do that?  I know you’re out there.  Making it in a pot is easy as well, but be careful about burning the bottom.

Anyhoo…  here’s the super easy and simple recipe for…

ROAST CHICKEN (Legs and Thighs)

Ingredients:

2 chicken legs

2 chicken thighs

Garlic Salt and Montreal Seasoning (sprinkle as much or as little as you want of each.  You know how you like it… ;-P )

Directions:

1.   Preheat oven to 350F

2.  Get your baking dish/tray and grease it up with coconut oil/butter/bacon fat/or anything else that is Paleo friendly/will keep your chicken from sticking to the dish.

3.  Season your chicken

4.  Place chicken on bakeware and pop in oven.

5.  Bake for 20 minutes and flip.  Then cook for another 20 minutes.

6.  DONE!!

image

image[1]

I don’t eat rice so I threw a small yam in the oven with the chicken.  When I flipped the chicken I also turned the yam.  They both come out at the same time.  Easy peasy!!

While all of this was cooking I experimented with home made Paleo friendly ice cream.  I will make sure to post the recipe, the pictures, and the review tomorrow.  I don’t have a fancy shmancy ice cream maker so it took a couple of hours of babysitting it to make sure that it was coming out right.  I checked it this morning and yes…  it came out right.  Again, I’ll post about it tomorrow.

Edit – 4/12/13:  Here is my recipe for the home made ice cream.

Lemon Pepper Salmon with a side of Roasted Rainbow Carrots in a Garlic Herb Butter Sauce

Every two weeks I get a “Harvest” box from this company called Full Circle and inside this box is a variety of in season local and organic fruits and vegetables.  FYI…  if you sign up you can save 25% with the promo code: NEWREFER and you would use my name in the “Who referred you” section.  If you’re interested let me know!!  😛  

Anyhoo…  in the box this week I got a  bunch of Rainbow Carrots.  Who knew that carrots can come in colors other than orange?  Each carrot has a different flavor to it and I would have to say that the traditional orange that we all know is still my favorite.  If I get a vegetable in the box that I have no idea how to cook, I usually look up different recipes and pick one that sounds the tastiest.  For this particular veggie I went with a simple roast and easy herbed garlic butter recipe.  It had also been a while since my last seafood dish so I figured salmon would pair up perfectly.

The fish that I used was frozen wild caught salmon that I purchased at Smart and Final.  Fresh is always better, but this is what I had on hand last night.  Please note that I do not measure when I cook so all measurements listed below are guesstimates.

Roasted Rainbow Carrots in a Garlic Herb Butter Sauce

Ingredients:
2 lbs of Rainbow Carrots (or if you don’t have these luxury carrots then go ahead and use regular carrots.  Oh and I THINK it was two pounds. Peel and chop em.)

image

1-2 tblsp of bacon fat (optional)

image[2]

1 stick of butter

4-5 Garlic Cloves (or if you have already minced garlic, but in about a tablespoon or two.  Depends on how garlicky you want it.)

1-2 tblsp of fresh Italian Parsley (Note:  You can use any herb that you like.  This is just what I had on hand.  If using dried herbs, I would suggest using 1 tblsp or less.)

Salt and Pepper to taste

Note:  So for this recipe I had leftover bacon grease from when I cooked bacon for a tuna salad recipe that I had made as a pre-workout snack earlier.  If you don’t have bacon fat then you can use coconut oil or even butter.  I also used the same pan that I cooked the bacon in and this pan happens to be oven safe.  If you don’t have an oven safe pan then a baking dish is absolutely fine.  The recipe below is how I cooked it with the pan, and I add additional instructions if you are using just a baking dish.

Directions:

1.  Preheat oven to 350F and Preheat oven proof pan on stove at medium high heat to melt the bacon fat/coconut oil/butter.

2.  When your pan is hot and what you put in it has melted put in the carrots.

image[1]

3.  Melt the stick of butter and while that is melting, mince up the garlic and parsley.  Mix.

4.  Stir your carrots that are sizzling in the pan.

5. Add butter mixture.

image[3]

6.  Stir to evenly distribute the butter mixture.

7.  Pop pan in oven and cook for 30-45 minutes until the carrots are tender, but not mushy.  Unless you like mushy then YAY!  😛

image[4]

Note:  So if you’re just using a baking dish, you can use two sticks of butter with the garlic and herbs.  Pour it over the carrots and then you stir/mix the carrots in the melted butter so that it’s all coated evenly.  Pop it into the oven for 30-45 minutes and DONE! 

Lemon Pepper Salmon

Ingredients:

1-2 lbs of salmon filet

3-4 tblsp of Extra Virgin Olive Oil

1 large lemon (You’re gonna squeeze the juice out)

Salt and Pepper to taste

Directions:

1.  Preheat grill to medium high heat.

2.  Place your salmon fillets in a bowl and add all ingredients.

image

2.  Make sure that all sides of the fish is evenly coated.

3.  Grab foil pieces big enough to wrap the fish.

image[1]

4.  Put fish on the grill and cook for 5 minutes on each side.  Fish is cooked when the meat flakes easily when you prick it with a fork.

Final step is to plate your carrots and salmon:

image[2]

Super YUM!!  I ended up pouring some of the butter sauce over the fish and that added more flavor.  Hope you enjoyed this dish as much as I did!!  ENJOY!

Paleo Friendly Mayonnaise

photo (4)

I didn’t realize how easy it was to make mayonnaise at home until the boyfriend made it.  No really, it is ridonkulously easy and although it doesn’t last as long as the conventional mayonnaise that you can get at the store, I guarantee that it’s tastier and healthier.  I highly recommend that you get an electric mixer of some sort to help with the mixing because it is A LOT of mixing.  Sure you can do it by hand, but it’ll be a whole lot easier if you have an electric one.  With this recipe, a stand mixer was used.  Please note that I don’t measure when cooking so all measurements listed below are guesstimates.

PALEO FRIENDLY MAYONNAISE

Ingredients:

3 egg yolks

1 tblsp of apple cider vinegar or lemon juice

1/2 tsp of sea salt

1-1/2 to 2 cups of extra virgin olive oil

1/4 tsp of dry mustard (optional)

Directions:

1.  Put egg yolks into the bowl and turn mixer (with the whisk attachment) on to the highest speed.  Leave it to do it’s thing for about 2 minutes.

2.  Add the vinegar/lemon juice, salt, and mustard (optional) to the bowl and mix for 30 seconds.

3.  Now pay attention here:  Add oil in SLOWLY!!  I’m talking drops, or a very VERY small and slow stream.  You don’t want to add the oil in too fast because then the eggs won’t absorb the oil.  It’ll curdle up.  Just do a little at a time, perhaps a tablespoon, until about 1/3 to 1/2 a cup.  Make sure that the oil has incorporated into the mixture before adding more.  After that you should be able to add the oil in a bit faster.  Keep in mind that the mixer stays on high this entire time.

1

4.  The mayonnaise is complete when you’ve poured in all of the oil, and when you lift the whisk from the bowl it’s thick and creamy.  This recipe should make about 2 cups.

2

The mayonnaise can be used right away, or you can store it in an airtight container in your fridge.  Expiration…  Depends on when you got your eggs.  If you got them farm fresh, then it is a month after first pick date.  If you used conventional eggs, then go with the expiration date on the package.  ENJOY!!

Edit:  4/23 – Just added two more pictures.  🙂

Curry Pork Chops with a Yam Noodle Vegetable Stir Fry

I had made this the other night hoping that my boyfriend would like it because he had mentioned to me before that he wasn’t a fan of pork chops.  I personally find it super tasty so I made them.

There’s a store next to where I live called Manila Oriental Market, or I like to call it MOM’s.  It doesn’t have the best customer service, but if you’re looking for Asian food that’s where I go.  The meat selection is huge and so is the seafood.  I couldn’t tell you if they had grass-fed or wild caught items there and believe me I’ve asked, but I don’t think they understand what I’m asking.  I’ve given up trying to find out and just smile, point, and raise my fingers to indicate how many pounds of that particular protein that I want.  the trick is to know what you want so that when they come to you there’s no attitude.  Oh and it always helps to smile and say thank you.

On this shopping trip I picked up some pork chops and a pack of yam noodles.

photo

Pork Chops

image (2)

Yam Noodles

Since I’ve changed my eating ways to that of the caveman I’ve been exploring alternatives to eating grains.  These noodles made of yam made an excellent substitute to the rice noodle.  There ‘s also shirataki noodles (Though make sure you check the ingredients on the bag because sometimes they sneak a little sugar or even soy into it) or even, my personal favorite, Konjac Glucomannan (The first noodle alternative I’ve tried and it’s purely the ground konjac root and water.  Nothing else.) which can be found HERE.  The Konjac noodles come in all different shapes and sizes so if you’re feening for some spaghetti, ravioli, or even rice they have em.  Plus, they’re inexpensive.

Anyhoo…  back to the recipe.  Please note that I don’t really measure when I’m cooking.  I pretty much eyeball everything so all measurements listed are guesstimates.  Please add a little bit of seasoning at a time and taste taste TASTE!

CURRY PORK CHOPS

Ingredients:

1 pound of pork chops

1-8.5 fl. oz. box of coconut milk (AROY-D is awesome because it’s 100% Coconut Milk, no preservatives and lasts for a year after purchase)

2-3 tablespoons of coconut oil

1-2 tsp of curry powder

Salt and Pepper or any other seasoning that you like to use.

image

Instructions:

1. Preheat your pan to medium high to high heat with your coconut oil in it.

2. Season your pork chops with the ingredients.

3.  Place pork chops on the pan.  Sear each side for 2 minutes.  Turn heat to medium.

4.  Pour coconut milk into pan.  Let cook for about 5-7 minutes.

image (1)

5. Take pork chops out of the pan and put them aside to rest.  (Or if you’re hungry and want em now ENJOY!)

For this next recipe I pretty much used the same pan.  So if you want, you can use the same pan or you can use a different pan.  Entirely up to you.  I figure I’m going to use the same seasonings on my stir-fry anyway, so why not?  Less mess for me to clean up in the end.

YAM NOODLE VEGETABLE STIR-FRY

Ingredients:

1 bag of Yam Noodles (Some noodles, like the shirataki and Konjac sometimes have a fishy smell to them.  That’s natural and it comes from the root.  Just give it a quick rinse and you’re good to go.)

2 Tomatoes (You can take out the seeds if you wish.)

7 sticks (are they called sticks? Meh whatever…) of Asparagus

3-4 garlic cloves

Handful of Baby Bok Choy

1/2 a yellow onion

photo (1)

Instructions:

1.  Make sure the pan you are using is on medium to medium high heat and you have some coconut oil in there.

2.  Just do a rough chop of all of your vegetables.

3.  Throw in the onions and asparagus.  When the onions are nice and caramelized (3-4 minutes) you can add the garlic and tomato.

4.  Add Yam Noodles.

5.  Add baby bok choy and cover pan.  Cook with lid on for about 3-5 minutes.

image (4)

POW!  Veggie Stir-fry COMPLETE!!

Note:  I didn’t add seasoning to this recipe because I had re-used the pan and it was plenty seasoned with the coconut milk, the curry powder, and the salt and pepper.  If you decide to make it on your own feel free to add whatever you like.  If I hadn’t made the pork chops I probably would have added some freshly minced ginger, low sodium soy sauce,and perhaps some mirin.

image (5)

Dinner COMPLETE!!

I prepared the leftovers for my boyfriend to eat for lunch the next day and he texted me with “Lunch was amazing love!!” 🙂

YAY!!

Hope this meal was amazing for you.  ENJOY!

Grass Fed London Broil, Sauteed Onions and a Broccoli/Cauliflower Puree

Can I tell you how much I love being a carnivore?  There’s nothing wrong with being a vegetarian or a vegan and I must admit that I went vegetarian for a week because a girlfriend of mine challenged me.  Challenge ACCEPTED!!  Though I must say that it was a lot tougher than I thought it was going to be.  My friend doesn’t eat meat at all.  Not even eggs.  You would think that a simple packet of instant miso soup would be fine, but apparently there is some kind of fish powder in there that wasn’t acceptable to her vegetarian ways.  I did pretty good in the end.  I did have a few mishaps only because I wasn’t  paying attention to the ingredients, but other than that I was good.  I learned that I am definitely a carnivore.

Anyhoo…  most of our grass-fed steaks or roasts are purchased at a store called Lunardi’s.  It’s a small selection, but it’s not like we buy much.  It’s usually only what we need for whatever meal we’re having that day.  For this particular recipe we got a london broil.  I believe it was about 2 pounds.  The boyfriend takes a mallet to it and beats it up pretty good.  Then it’s seasoned with salt and pepper.  We usually keep our steaks simple.

photo

The grill is then fired up and it doesn’t stay on there too long.  We like our steak blue-rare to rare.  I’m talking about the steak still mooing and asking, “Why are you doing this?!  I just wanted to eat grass and produce milk!!” and we respond with, “Because you’re super delicious and belong in my belly!!”

photo (6)

The steak rests on the cutting board for a couple of minutes prior to slicing…

photo (5)

Looking at this picture makes me want steak…  So for the side dishes it’s very simple.  Please note that I do not measure when I’m cooking so the measurements listed are guesstimates.  I’m also not very good at keeping track of how long to cook things as I eyeball it.  More guesstimates.

SAUTEED ONIONS

Ingredients:

1 small yellow onion (sliced like you’re going to make onion rings)

1 small red onion (sliced like you’re going to make onion rings)

A handful of small peppers, maybe 5-7 (to be honest I have no idea what these peppers are called.  We bought them at Nijiya Market in Sunnyvale.  They’re not too spicy, but it gave it a nice kick.  You don’t have to add them.  It’s just what the boyfriend put in at the time.  You can also put in some minced garlic.  That would be tasty too!)

2-3 tablespoons of coconut oil

salt and pepper to taste

Instructions:

1.  Heat up a frying pan with the coconut oil on medium or medium high heat.

2.  Throw in all ingredients (except salt and pepper) and sauteed it up until the onions are nice and golden.  Maybe…  10 minutes.  Just keep an eye on them.  Of course, you don’t want to burn them.  The edges should have a nice gold/brown to them.  It should also lose it’s sturdy circle shape and they should be soft and limp.  Add salt and pepper to your taste.

photo (7)

BROCCOLI and CAULIFLOWER PUREE

Ingredients:

1 head of broccoli (chopped)

1 head of cauliflower (chopped)

1 box of chicken stock.  (I’m not sure how big the box was.  I’m thinking it was 16 oz.  but I could be wrong.  Either way, I used the entire box and it was enough to cover the veggies.  If you don’t have enough stock then just add water.  If you have too much, then only put enough to cover the veggies and save the rest in the fridge.  Oh and if you don’t have stock at all then just use water.  You’re going to drain it anyway.  I use stock because it gives it a bit more flavor.)

4 tablespoons of butter

Salt and Pepper to taste

1/4 – 1/2 cup of Milk or Heavy Cream (optional)

Instructions:

1.  Get a pot large enough to fit all of the vegetables and the chicken stock/water.

2.  Put the cover on and turn to high heat.  Boil that sucker for 10-15 minutes.  Check on it every now and again to see if the vegetables are cooked through and soft.

3.  Drain when cooked.

4.  Add butter and milk/heavy cream.

5.  Blend until it is the consistency that you like.

6.  Add salt and pepper to your liking.

photo (2)

By now, everything is cooked.  Your kitchen smells delicious and I’m sure you are very very hungry.

photo (1)

I am considering looking up my vegetarian adventure posts that I typed up about a year ago and posting them on here.  I ended up trying out some new fruits and vegetables that I think would be fun and educational for anyone that might be interested.  Anyhoo…  I hope you enjoyed this recipe as I know I did.  🙂

Grilled Halibut served with a Purple Yam/Bell Pepper/Macadamia Puree

My boyfriend and I made this dish last night and it put us into a food coma.

image

Grilled Halibut served with a Purple Yam/Bell Pepper/Macadamia Puree

I have been thinking about renaming dishes to something that would be shorter to say.  This is quite a mouthful.  Anyhoo… We started on the marinade for the Halibut first.  Please note that while cooking I do not make a habit of measuring things out.  I kind of just eyeball it.  The measurements below are guesstimates.  Please use your best judgment.  Recipes are below…

Grilled Halibut

Ingredients:

2 Halibut filets (1 pound)

3-4 tablespoons Extra Virgin Olive Oil (EVOO)

1/2 lemon (You’re gonna squeeze the juice out)

2-3 cloves of garlic (chopped/minced)

Salt and Pepper to Taste

Instructions:

1.  Place all ingredients except the lemon juice in a bowl or plate.  (Don’t worry…  you’ll use the lemon a little later.) Toss the fish so that it’s covered all over.  Let sit for about an hour or so.

photo (3)

2.  After the wait, fire up the grill.  You want it to be medium high.

3.  While the grill is getting to the correct temperature you can go ahead and squeeze that lemon juice out over your fish.  (I put it on now so that the acid doesn’t cook the fish while it’s in the marinade.)

4.  Place the fish on the grill skin side down and let cook for 5-6 minutes.  Use a spatula to flip it over and cook for another 5-6 minutes.  You will know that the fish is cooked when the meat flakes easily with a fork.

Notes:  You can also pan sear the fish using butter (REAL butter not that fakey butter) or coconut oil (don’t use vegetable or canola oil.  Those are bad for you!) and it will cook at medium high heat for 5-6 minutes on each side. You can also bake it at 450 degrees F for 8-10 minutes.

Purple Puree (I definitely need a better name for this.  Any ideas?)

Ingredients:

image (4)

2 small – medium Purple Yams/Sweet Potato (I think it was about a pound)

1 small white onion (chopped)

4-5 cloves of garlic (chopped)

2 Red Bell Peppers (Tops cut off, seeded and chopped)

2-3 tablespoons of coconut oil

1/3 cup of roasted unsalted macadamia nuts

4 tablespoons of butter

1-2 tablespoons of parsley (chopped)

Salt and Pepper to taste

Instructions:

1.  Wash your purple root, peel it and chop it up.  Throw it in a pot and cover it with water.  Turn the heat to high and let it boil.  It’s done when you can stick a fork in them easily.  Drain the water.

image (1)

2.  While you wait for the purple stuff get a pan and heat it to medium/medium high heat and let your coconut oil get warm.  If you haven’t already prepped your veggies you can use the heat up time to do so.

image (2)

3.  Throw the onion in the pan and cook til they are nice and golden.  Add bell pepper and cook for 3-5 minutes.  Add garlic and cook for 2-3 minutes.  Add parsley and cook for 1 minute.  Add as much salt and pepper to your taste.

4.  So by now the purple stuff is cooked and the other veggies have been sauteed nicely.  Grab a food processor and throw everything in.  (Purple stuff, veggies, macadamia nuts, and butter.)  Puree it all!  If it is too thick for your taste you can add a little milk til it is the consistency that you like.

image (3)photo

Notes:  I think for next time I will cook the purple yam in chicken stock or beef stock to give it a bit more flavor.  For you vegetarians out there you could even use a vegetable stock to cook it in.  

And there you have it!  Serve while everything is still hot/warm and ENJOY!

Meatloaf Muffins

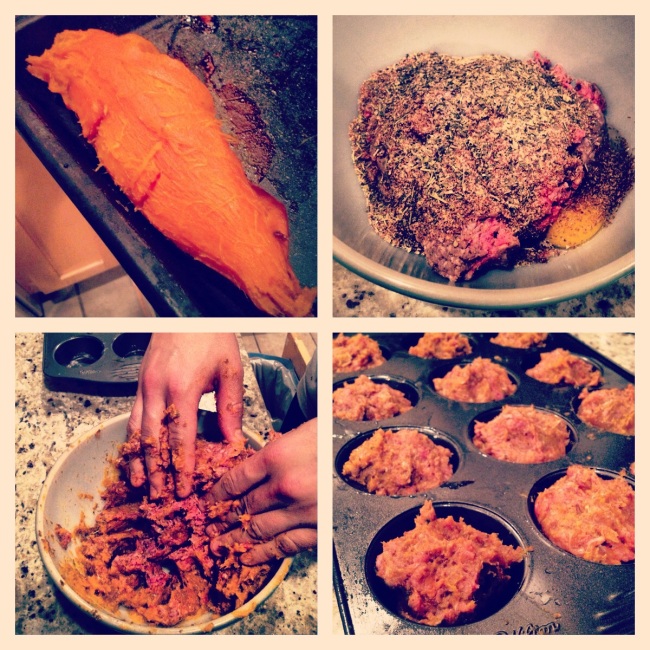
The boyfriend and I made these the other day while we were prepping meals.  It’s a super simple recipe and tasty.

Image

Ingredients:

1 lb of ground beef (preferably grass fed.  You can use ground turkey/chicken/pork as well.  Entirely up to you.  For this one we used beef.)

1 egg

1/2 cup ground flax seed

1 large sweet potato (Cook it in the oven or steam it or however you want to cook it.  Peel it and mash it)

1/4 tsp sea salt

3 garlic gloves chopped/sliced/diced etc.

Herbs and Spices.  To be honest I have no idea what the boyfriend threw into the bowl.  I told him to have at it and he did.  My guess…  Rosemary, black pepper, oregano, onion powder.  If there is a spice or herb that you like then throw it in there.  Make it however you want it.

Instructions:

1.  Preheat the oven to 375 F

2.  Get a muffin pan and grease it up with coconut oil, butter, EVOO…  You don’t want your muffins to stick to the pan.

3.  Take all of the ingredients and mix it together.  Use your hands!  Get in there and just mash it up!  HULK MASH!!

4.  Evenly distribute the mixture amongst the muffin tins.

5.  Pop em in the oven for 30 minutes and when they’re done let them cool down a bit before taking them out before serving.

Image

Now one of them will fill me up if I just need a snack after the gym.  If I’m having lunch, two of these bad boys and a side of veggies satisfy the hunger.

This recipe is quick and easy.  Not much prep needs to go into making this dish.  The sweet potato you would have to cook beforehand, but other than that it’s simple.  What I would do to change it up a bit is perhaps line the muffin tins with bacon.  I ❤ bacon…  I will have to throw my meatloaf recipe on here one of these days.  There’s a bit more prep that goes into making a whole loaf of meat, but it’s SO worth the time and the effort.  Again, the above recipe is simple and easy.  ENJOY!